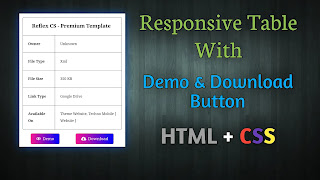
How to Add Responsive Table With Demo & Download Button in your Blog - Post

Hey Guys! Welcome back to Techly Series website.
Assuming You are observing the Responsive Table With Demo & Download Button Script on blogger. This is the Right Place to you. Since You can get this Script for free.
Today, in this article, I will Discuss with you about How to Add Responsive Table With Demo & Download Button in Your Blog Post.
How to Add
So, to add Responsive Table With Demo & Download Button on blogger you need to follow the following process below precisely.
What's more, with the help of these steps, you can easily add this feature in your blogger website.
Step 1
- You will go to your - Blogger Dashboard
- Go to Theme
- Go to - Edit HTML
- Search - </head> or </head>
- Copy this CSS Code below and Paste on top of </head> or </head>
- Save Theme
You must back up your theme before go to Edit HTML
<style>
table{min-width:70%;margin:0 auto;border:0;overflow:hidden;font-size:14px; word-break: normal}
table th{padding:20px;border:1px solid #000;border-left-width:0}
table th span{font-size:20px}
table th:first-child{border-left-width:1px;border-radius:0 0 5px 5px}
table th:last-child{border-radius:5px 5px 0 0}
table td:first-child{border-left-width:1px}
table td{padding:20px;border:1px solid #000;border-left-width:0;border-top:0;vertical-align:middle}
table tr:last-child td:first-child{border-radius:0 0 0 5px}
table tr:last-child td:last-child{border-radius:0 0 5px 0}
table tr:nth-child(2n+1)
table{display:block;overflow-y:hidden;overflow-x:auto;scroll-behavior:smooth}
.Button{display:flex;justify-content:space-around;margin-top:15px}
.Demobutton,.Downloadbutton{color:#fff;background:linear-gradient(to right, rgb(248, 24, 148), rgb(0, 0, 255));border:1px solid #ff0000;border-radius:5px;font-size:16px;padding:10px 20px;outline:none}
.Demobutton i,.Downloadbutton i{margin-right:7px}
.Demobutton:active{padding:12.5px 20px 7.5px 20px}
.Downloadbutton:active{transform:scale(0.95)}
</style>
<script crossorigin='anonymous' src='https://kit.fontawesome.com/4ad360bfd2.js'></script>
Step 2
- After Save Theme
- Copy this HTML Code and Paste anywhere you like
- Replace All
- Done.
<div class="File">
<table>
<tbody>
<tr>
<th colspan="2" style="text-align:center">
<span>Reflex CS - Premium Template</span>
</th>
</tr>
</tbody>
<tbody>
<tr><td><b>Owner</b></td><td>Unknown</td></tr>
<tr><td><b>File Type</b></td><td>Xml</td></tr>
<tr><td><b>File Size</b></td><td>350 KB</td></tr>
<tr><td><b>Link Type</b></td><td>Google Drive</td></tr>
<tr><td><b>Available On</b></td><td>Theme Website, Techly Series [ Website ]</td></tr>
</tbody>
</table>

<div class="Button">
<a href="#">
<button class="Demobutton"><i class="fa fa-eye"></i>Demo</button>
</a>
<a href="#">
<button class="Downloadbutton"><i class="fa fa-cloud-download"></i>Download</button>
</a>
</div>
</div>
Final Words
You ought to indeed note by thinking in the remark box underneath. Or on the other hand you moreover bear to give some sort of Suggestion, likewise you can partake your conviction with me in the Comment Box beneath.
I didn't give this content to any individual who saw or replicated them. This content I've looked through a great deal and given by experience. So kindly don't note on this substance.
Assuming you experience any issues while copying this script you can impart me by Telegram and I'll attempt to help.
Post a Comment